


Figure ![[*]](http://sepwww.stanford.edu/latex2html/cross_ref_motif.gif) shows the window to control
the three Slicer modules
connected to the network shown in Figure .
The two options to perform the slice-extraction
operation (pre-transpose and on-the-fly) are selected and monitored
by the toggle buttons on the right hand side of the controls.
The axes to be displayed are selected by typing their number
near the labels HAxis and VAxis.
After this selection the program automatically
pops up
at the bottom of the window
the sliders for positioning the slices.
If N is the dimensionality of the dataset to be displayed
(in our example N=4) the program creates N-2 sliders.
A movie of the data can be created by continuously
stepping along the sliced axes.
Our network includes many instances of the AVS module animated integer
for animating the sliders in the Slicer module.
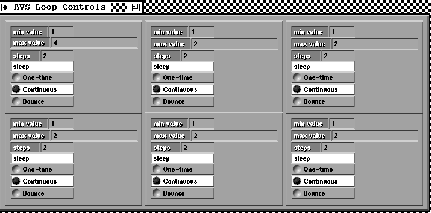
Figure shows the control panels that are available
to the user for controlling the looping in the movie.
shows the window to control
the three Slicer modules
connected to the network shown in Figure .
The two options to perform the slice-extraction
operation (pre-transpose and on-the-fly) are selected and monitored
by the toggle buttons on the right hand side of the controls.
The axes to be displayed are selected by typing their number
near the labels HAxis and VAxis.
After this selection the program automatically
pops up
at the bottom of the window
the sliders for positioning the slices.
If N is the dimensionality of the dataset to be displayed
(in our example N=4) the program creates N-2 sliders.
A movie of the data can be created by continuously
stepping along the sliced axes.
Our network includes many instances of the AVS module animated integer
for animating the sliders in the Slicer module.
Figure shows the control panels that are available
to the user for controlling the looping in the movie.
 |

 |
.
When more than one orthogonal slice is extracted from a dataset,
and the slices are displayed in a flat view,
it may be useful to show the relative positioning of all the
slices in the display.
This task is accomplished by superimposing lines onto the images
where the slices intersect each other.
To properly position the lines on the images,
each instance of the Slicer module needs
to communicate with all the other instances of Slicer in the network.
These communications are performed through the horizontal
data links shown in the network of Figure .
Using the information gathered from the other Slicers,
each Slicer can determine the positions of the lines on its
own image. This information is passed to the Pan_Zoom module
that actually superimposes the lines onto the images.
To further facilitate the interpretation of the display,
the superimposed lines are color coded; i.e., lines indicating
the position of the same slice are shown in the same color.