


Next is a multi script example. It is designed to allow the user
to choose the parameters for a pipeline of three seplib processes. The
main script is used to edit dialog fields containing parameters that specify
the input file and the parameters for each of the three programs (Byte,Ta2vplot
and Tube). Once the user is satisfied with the parameters he can press the
button at the bottom of the panel to run the command. Figure ![[*]](http://sepwww.stanford.edu/latex2html/cross_ref_motif.gif) shows the main panel. Here is the corresponding script file. Notice that
the layout for each program is the same, it is defined in a macro
and the macro is used three times, once for each program.
shows the main panel. Here is the corresponding script file. Notice that
the layout for each program is the same, it is defined in a macro
and the macro is used three times, once for each program.
button={ label=QUIT action=QUIT }

dialog={ name=input label="Input filename" value="Dat/in.H" }
! macro for a dialog for a program called "NAME", a popup panel and self doc
#define PROGRAM(NAME)  hbox={ name=noborder    vbox={ name=noborder      button={ label="NAME panel"           action="ASSIGN NAME `xtpanel -file pars/NAME`"}      button={ label="NAME doc. "        action="xtpanel -cpp -file pars/doc -DPROG=NAME -font fixed &"      }    }    dialog={ name=NAME value="            " }  }

PROGRAM(Byte)
PROGRAM(Ta2vplot)
PROGRAM(Tube)
! perform the action or popup an error dialog if the input doesn't exist
button={ label="PRESS FOR: Byte | Ta2vplot | Tube"
action="if test -f $input ; then
	  <$input Byte $Byte | Ta2vplot $Ta2vplot | Tube $Tube &
        else
	  xtpanel -message 'File $input does not exist' -quit
        fi "
}
|
pipeline
Figure 8 A panel to control the execution of three seplib programs. | 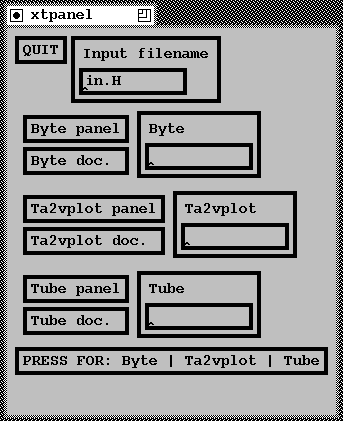 |

Each parameter file dialog has a two buttons next to it. The lower button invokes a script that causes the program to self document. This documentation is shown in a text object. The script to do this is very short, note that the preprocessor is used to replace ``PROG'' by the appropriate program name. (The connection of stdin to /dev/tty is to force the program to self doc.)
button={ label=DONE action=QUIT }
text={ value=`( </dev/tty PROG 2>&1)` height=400 width=500}
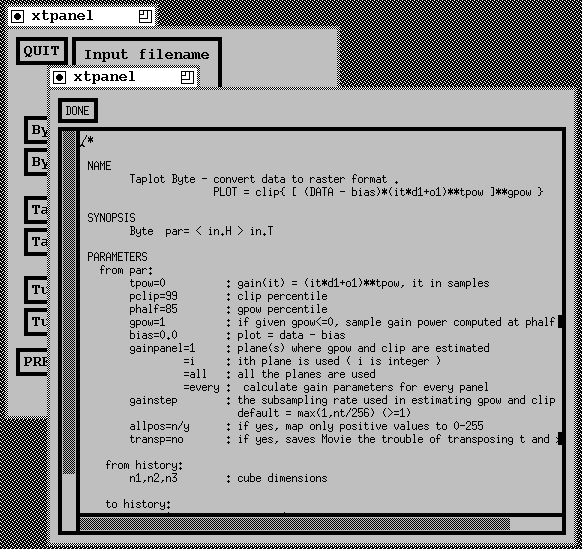 |
Pressing the upper
button brings up a subsidiary panel that contains interactive objects that
can be used to specify the parameters. When the subsidiary panel is closed
the dialog is set to contain the parameters chosen on the subsidiary panel.
Figure shows the panel for Byte. The script file for this panel
follows.
slider={ name=pclip min=50 max=100 value=98 format="%.1f" }

slider={ name=gpow min=0. max=4. value=1. format="%.2f" }

menubutton={ name=gainpanel label="gainpanel=>" value=1
             itemlist={ list="1 every all"}
           }

choice={ name=transp value=n
         item={ label=yes value=y }
         item={ label=no value=n  }
        }

button={ label=Done
 action="PRINT pclip=$pclip gpow=$gpow gainpanel=$gainpanel transp=$transp "
 action=QUIT
}
|
bytepar
Figure 10 The panel for interactively setting Byte parameters is obtained by pressing the ``Byte panel'' button. | 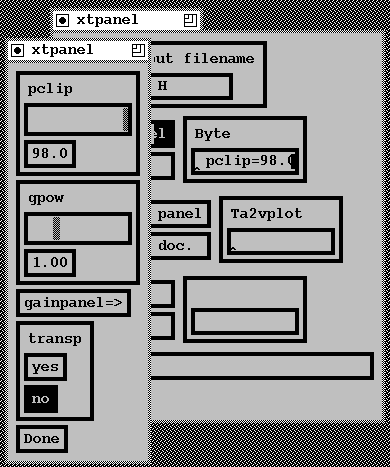 |
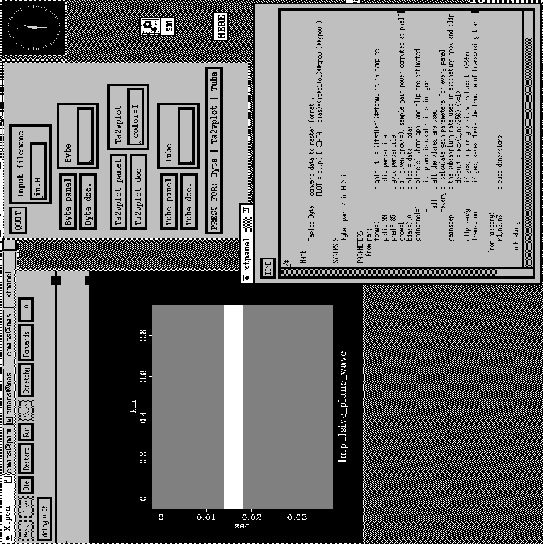
Finally Figure shows the result of pressing the bottom button
to run the command. Notice that the self doc is still available, as the
xtpanel process to perform the self doc is run in the background. The final
command is also run in the background so that you can have multiple results
visible on the screen at the same time so that they can be compared.
 |